Understanding how histograms are used in digital photography

This content is 16 years old. I don't routinely update old blog posts as they are only intended to represent a view at a particular point in time. Please be warned that the information here may be out of date.

The backlog of photography-related posts for this blog is now almost as long as the virtual pile of half-written IT-related ones but I’ve been meaning to write something about histograms in relation to digital photography ever since Andy Gailer‘s presentation on working with raw digital camera images at my local camera club last year.

For the first few years that I owned a digital camera, I ignored the histogram – quite simply because I didn’t understand it. Since Andy explained it to me, I find it an incredibly useful tool for helping me ensure that I’ve captured the maximum amount of data in my images.

The histogram, quite simply, shows 256 levels of light (tones) that are present in an image. The peaks indicate a large volume of pixels in a particular tone and the troughs appear where there are fewer pixels. On the left side of the histogram are the dark areas and on the right side are the lighter areas.

Image showing a Royal Mail postbox in the snow (underexposed)Take, for example, the accompanying picture of a post box outside a gift shop. As can be seen, I took this after a snow fall and I didn’t compensate for the light reflected by the snow. Even though the camera’s automatic white balance would have attempted to make some corrections, the snow shows as grey and the histogram tells me that most of the pixels occur in the darker areas to the left of the graph.

A histogram from an underexposed imageMy camera will show me a histogram but if I view this in Adobe Photoshop, I can see a little more detail. As well as some statistical data about the mean levels and the standard deviation, I can hover my mouse pointer over the graph and see how many pixels appear for a given level. In this case I can see that at level 247, there are only 24 pixels (out of more than six million in the entire image) – effectively there is very little happening in the highlights.

Adjusting levels using the histogramBy adjusting the levels, I can alter the highlights (white slider), midtones (grey slider) or shadows (black slider) and improve the overall exposure of the image. Effectively, I set the black and white points and adjust the contrast.

The ideal histogram is evenly distributed with no breaks and a gradual tail off for shadows and highlights. If I hold the Alt key (Option key on a Mac) as I preview the adjustments, I can see the pixels which are being clipped from the image and I should stop just before this become noticeable (Adobe Camera Raw will show clipping as blue or red pixels when this option is enabled). A few points to note are:

  • Over-exposed images will have clipped highlights and under-exposed images will exhibit clipping in the shadow detail.
  • The vertical scale is of no real consequence (it’s just an indication of the number of pixels at any given light level).
  • Clipping is effectively throwing away part of the detail in the image and should be avoided where possible although it can be used to effect (e.g. as a deliberately high- or low-key image).
  • By adjusting the midtones, the overall brightness of the image may be altered without clipping.
  • Low contrast images will have a very narrow histogram, whilst high contrast images will cover more of the graph.
  • Techniques such as high dynamic range (HDR) photography (and tone mapping) can be used to increase the light levels captured in the image – effectively increasing the exposure latitude.
  • For finer control, individual histograms may be viewed for red, green and blue colour channels or the luminosity.

Image showing a Royal Mail postbox in the snow (levels adjusted)In this example, I have adjusted the highlight details by moving the white slider from 255 to 203 (and Photoshop has automatically adjusted the midtone levels for me). Histogram on an adjusted imageThe end result is a picture which appears to be better exposed although looking at the histogram tells me that there is some detail missing from the shot now (effectively 42 levels have been cut out and the remaining 204 levels of light have been redistributed across the scale – hence the gaps in the graph). These gaps/spikes are an indication of a phenomenon known as image posterisation (or banding) which is not very evident in this image but can generally be spotted in areas of shadow, or the sky, caused by a reduction in the bit depth of the image.

There are those who will say that image adjustment using levels is a very crude tool; however it’s useful to demonstrate how to read histograms. Hopefully this post has thrown some light onto what is one of the more technical aspects of digital photography but is also a very useful tool.

Christmas gadgets in the Wilson family

This content is 16 years old. I don't routinely update old blog posts as they are only intended to represent a view at a particular point in time. Please be warned that the information here may be out of date.

I’m writing this a couple of days after Christmas, as the great British public starts is looking for bargains in the sales.  If you’re reading this blog, the chances are that technology plays a significant part of your life if which case it’s likely that Father Christmas/Santa Claus/St. Nick/whoever distributes presents to your house brought you at least one gadget for Christmas.

The old saying is that giving is better than receiving and I gave away a couple of gadget gifts this Christmas with which the reciepients have been particularly pleased, so I wanted to tell you a little bit about them…

Pure Evoke-1S DAB digital radio

First up is the DAB digital radio that I bought for my wife.  Normally, she despairs of my penchant for expensive electronic items but a few weeks back she returned from a girly weekend in Sheffield and told me that some friends of ours had a digital radio and she’d really like one.  Naturally, I was pleased – I’d toyed with the idea for a while but I don’t listen to enough radio to justify it – I was even more pleased when it transpired that the model that had impressed her so was from Pure and it was the Evoke-1S.

Pure Evoke-1S
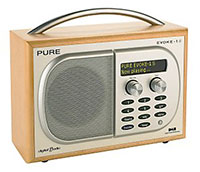
Pure is one of the better-known digital radio producers in the UK and the Evoke-1S is the current version of a model that has been around for a while.  Whilst some consider the wooden finish to be a little tired, I much prefer it to the cheap-plastic-sprayed-with-metallic-effect-paint that seems to be the current trend for consumer electronics.  It sounds pretty good too.  One speaker means mono but this is a radio (not the ultimate in high fidelity sound presentation) and anyway, this device lives in our kitchen (which does not have the best acoustics either).  For what we wanted – access to digital radio in an attractive unit at a reasonable price, this unit is perfect.

How perfect? Well, the setup process was easy enough for Mrs. W to get up and running in a few seconds with no intervention from me – that’s a good start.  It also has an alarm, and a kitchen timer.  There’s provision for a second speaker, as well as an auxiliary input (I’ll probably get an iPod dock and then I can use it to catch up on downloaded episodes of The Archers).  Then there is a USB port for software updates (e.g. to DAB+, should it ever reach these shores).

The Evoke-1S is just one of many models available from Pure (for a little more money I thought the Evoke Flow looked good, featuring Internet radio in it’s capabilities) but it was also a bargain.  Available for around £96 from most electronics retailers (maybe less if you go for the Cherry version – we preferred the Maple finish), I bought ours from John Lewis Online.  John Lewis Online’s packaging is terrible (it’s just a strong plastic bag) so the box was a little beaten up when it reached us but they were happy enough to offer me a discount by way of compensation.  The next day, I saw it on sale in PC World for £68.47 so I bought that (to guarantee stock) before getting John Lewis to price match (John Lewis Online won’t price match but the brick and mortar stores are never knowingly undersold and they refunded and resold the item to me, after which I returned the unit I’d bought in PC World).  Why the complicated refund and resale?  Because John Lewis offer a 2 year warranty on all new electrical purchases and because, if I had to guess which of the two retailers will still be trading in 2 years time, John Lewis looks a more certain bet to me than PC World’s parent company, DSG International (it should be noted that I have no information to back that up – it’s purely a personal opinion).

To find out more about the Evoke-1S, there’s an FAQ on Pure’s support pages.

VTech Kidizoom Multimedia Digital Camera

My children have grown up in the glare of my digital cameras and we thought that my 4-year-old would enjoy one of his own (for the last year or so he’s been playing with an old disposable camera body that I glued shut and he loves taking pretend photos).

VTech KidizoomAfter looking into the various options for rugged digital cameras (i.e. those with rubberised bodies designed to withstand the inevitable knocks and bangs which will be inflicted by children), we settled on a VTech Kidizoom (which we got 20% off by using a voucher at ELC). What we hadn’t realised was just how big a hit this would be.  By the end of Christmas day he had taken over 400 pictures and it was pushing 700 by the end of Boxing Day!  Furthermore, he takes his camera everywhere with him (just like his Dad… although I don’t take mine to bed with me!) and looking at his pictures has given me a great insight into the things that interest a 4-year-old (pictures of Mummy, Daddy, his brother, visiting grandparents, uncles, cousins, etc., his toys, the food on the table, his teddy bears, the Christmas tree, the television, the view from the car window, boats on the lake in the local country park, the produce in the supermarket, etc., etc.).  I simply cannot stress how much my son loves this present – I have never seen anything hold his attention for so long.

Ironically, we nearly didn’t buy it for him – most of the reviews concentrate on the poor quality of the pictures, the inadequate flash, the fact that the pictures in the internal memory are lost when the (non-rechargeable) batteries run out, etc. and, having experienced the device now, I wanted to set the record straight.  After all, I think I’m qualified to do so: as a parent; an amateur photographer; and as an IT bloke.

Firstly, picture quality.  Yes, this is a 640×480 (0.3MP) camera and so the pictures are not great – that’s putting it mildly – actually they are pretty awful, with sludgy colours and high compression.  But it’s also in the hands of a 4-year-old!  He may take the odd picture that’s OK but these are unlikely to be the family album shots and he’s more than happy looking at them on the computer screen or the TV (the camera is supplied with USB and composite video leads for connection to a PC or a TV).

Here’s an example of one of the pictures – at 33% and a section at 100%:

Sample image taken with a the VTech Kidizoom (33 percent)Section of a sample image taken with a the VTech Kidizoom (100 percent)

Next, the flash – it’s not very powerful (probably for safety reasons… as little people are bound to hold the camera the wrong way around and take a self portrait) and it bleaches out anything close-up, but it does the job – sort of.  I’ve come to the conclusion that this camera is designed for pictures to be taken at a distance of around 1.5 metres (which is the sort of distance my son stands from his subject anyway!) but pictures taken outside are definitely better.

Sample image taken with a the VTech Kidizoom using a flashSample image taken outdoors with a the VTech Kidizoom

The Kidizoom comes with 16MB of internal memory and the instructions do warn that it will be erased if the batteries (4xAA) run out but it also has an SD card slot and the pictures on this card are safe in the event of power loss.  I’ve set my son’s camera to use an old 1GB SD card by default and that’s around 33,000 of his pictures (it was just an old card that I was using for ReadyBoost on the PC and is too small to be useful in any of my cameras).  Basically, RTFM and then losing photos when the batteries run out won’t be a problem.

Sample image taken with a the VTech Kidizoom and border added in-cameraI haven’t used the supplied software – both Windows and Mac OS X detected the internal memory and the SD card as removable drives and were happy to copy over the pictures.  The camera also includes a video mode and some games but we haven’t used them yet – at this point still photos are a big enough attraction.  It’s a bit too easy for the kids to turn the flash off (although I had to read the manual to work out how to turn it back on) and quite a few pictures seem to have had a novelty border added by accident but these are minor issues given the market at which this camera is aimed. There’s also no EXIF data and the date and timestamp seems to be added when the image is copied from the camera – not when it’s taken.

In summary, this camera is far from perfect but I also have to remember that my 2-year-old will get his hands on it too and it’s more than good enough to last the next couple of years until they can both be trusted with a “grown-up” digital compact.  In terms of entertainment value it’s been a huge hit – most children emulate their parents and mine are certainly happy to be snapping away like their Daddy.

Nikon D60 DSLR camera

Nikon D60 and 18-55VR kitMy brother used to be a reasonable photographer but these days he hardly picks up his film camera (a Minolta X300, which, incidentally, last time I used, I really enjoyed for it’s raw simplicity).  In an attempt to set things straight this Christmas, his other half bought him a Nikon D60 kit, based on advice from me, including an 18-55VR lens (see DP reviews for a review of the D60).  The lens is a standard kit lens – cheap, built of plastic, slow glass – but is enough to get him started (and he can borrow one of mine if he needs to).  He brought it over to my place on Boxing Day and I was impressed – in fact I would say that, as a consumer DSLR, the D60 is fantastic.  It’s not the top of Nikon’s range (far from it) but it matches or exceed most of the features in my aging D70, packs in more pixels (10.2MP), includes image sensor cleaning, and is smaller, lighter, and more compact.  All in all, it’s a great DSLR – especially at around £300.

If you prefer Canon then all I have to go on is the fact that my Dad seems pretty pleased with his new 1000D, which appears to be broadly equivalent to the D60.  If you’re looking at any other brand for a DSLR I’d question why – Canon and Nikon are the market leaders which means there is a huge range of OEM and aftermarket support (accessories, etc.) and both offer plenty of scope to progress to a more advanced model, if required, at a later date.

Closing thoughts

Apologies to those who don’t find these items remotely interesting but this website comes up on enough Google searches that hopefully my comments will be of use to someone.  And if someone bought you something for Christmas that you think is fantastic and you’d like to share it with the world, please leave a comment on this post.

As for me – what gadgets did I receive this Christmas?  Nothing in particular (I bought myself a netbook a few weeks ago and most of what I asked for was books – like the excellent Landscape Photographer of the Year collections) but I do collect Pixar movies and I’m just about to sit down and enjoy the DVD of WALL-E that Father Christmas left in my stocking!

Camera raw support in Windows Vista and later

This content is 16 years old. I don't routinely update old blog posts as they are only intended to represent a view at a particular point in time. Please be warned that the information here may be out of date.

Most of my digital photography workflow takes place on a Mac, where I use Adobe Camera Raw and Bridge/Photoshop CS3 to handle camera raw images.  With my recent purchase of a netbook (which is small enough and light enough to take out with me on a shoot – and less expensive than a dedicated storage device like an Epson P-7000), it would be useful to view the images in Windows but the Microsoft Raw Image Thumbnailer and Viewer for Windows XP has not been updated since 2005 and is not compatible with Windows Vista or later.

I did wonder if the technology had been absorbed into Windows Explorer and it seems it has… I found a forum post that suggests using Windows Photo Gallery and then installing some codecs (this post has more information on raw support in Windows Vista) but it turns out that the camera raw codecs are also available for direct download (i.e. with no need for Windows Photo Gallery) and after installation the raw file contents are available in thumbnails, previews and applications.

Unfortunately the major manufacturers (Canon and Nikon) do not produce codecs for 64-bit Windows (i.e. for people running high-end workstations with lots of memory for editing large images…) but the 32-bit codecs are fine for my little netbook with 2.5GB of RAM and there is 64-bit support for Adobe digital negatives (.DNG).

During installation, the Canon codecs complained that the screen resolution was not high enough on the netbook (1024×576) and refused to install but that was easily overcome by connecting to an external monitor with a higher resolution (no such issue with the Nikon codecs).

Incidentally, whilst I was researching this blog post I found that Microsoft also has an interesting program called Pro Photo Tools, which includes the ability to geotag photos, edit metadata, convert between raw formats, TIFF, JPEG and HD Photo; and work with Sidecar (.XMP) files (for interoperability with Adobe products – i.e. Bridge).  It too relies on the installation of the relevant raw codecs but should fit in quite nicely for some basic metadata tagging on the netbook whilst still in the field before transferring the images to the MacBook for any final tweaks when I get home.
Nikon raw image viewed in Microsoft Pro Photo Tools

How tone mapping can transform an HDR image

This content is 16 years old. I don't routinely update old blog posts as they are only intended to represent a view at a particular point in time. Please be warned that the information here may be out of date.

A few weeks back, I wrote about my efforts to create a photographic image with high dynamic range (HDR). Since then, I’ve learned that Adobe Photoshop’s approach to HDR is really little more than exposure blending. I had been reasonably pleased with the results (at least on screen) but then I gave Photomatix Pro a try.

Pointe de Trévignon HDR from Photomatix Pro

The initial HDR image that Photomatix Pro produced was disappointing, with deep shadows and washed out skies, but then I read in the help text that this was effectively in an unprocessed state, that my monitor cannot display the full range of information and that, in order to reveal highlight and shadow detail, I need to apply tone-mapping. Photomatix Pro did that for me and – wow! What a difference!

Pointe de Trévignon HDR from Photomatix Pro after tone-mapping

I thought this looked a little too surreal on screen so I reduced the luminosity (it’s actually much better when printed) but you can see how the detail is preserved throughout the entire exposure.

Pointe de Trévignon HDR from Photomatix Pro after tone-mapping

If I find myself creating other HDRs, I’ll probably purchase a copy of Photomatix Pro (and probably the Photoshop plugin version too) – until then I can continue to experiment with a fully-functional trial (but the resulting images will be watermarked – these screen shots are low-resolution previews). In the meantime, I’m going to try and get my head around the technical details of dynamic range, tone mapping and HDR imaging.

Working with raw digital camera images

This content is 16 years old. I don't routinely update old blog posts as they are only intended to represent a view at a particular point in time. Please be warned that the information here may be out of date.

Recently, I went along to one of the meetings of my local camera club, which is something I’ve been meaning to do for a while but somehow never got around to. At the meeting, one of the members (Andy Gailer) gave a really interesting presentation on working with raw images. I’ve repeated most of the highlights here, adding a few notes of my own along the way.

Technical details

Raw images are exactly that – the raw pixel data that is captured by a digital sensor. So, in order to understand the use of camera raw, it helps to understand a little bit about the technology that creates the image.

Probably the most important part of a digital camera is the sensor that converts available light into electrical signals. Two types of sensor are commonly used: charge-coupled device (CCD); and complementary metal oxide semiconductor (CMOS). CCD is a more mature technology but CMOS is gaining popularity as it can be implemented using fewer components, requires less power and provides the data more quickly.

Regardless of the technology in use, digital camera sensors consist of an array of photodiodes (or “pixels”) collecting photons (minute amounts of energy which combine to make light) and each pixel is fitted with a microlens to focus light into the sensor site. The number of photons collected in each pixel is converted into an electrical charge and this charge is converted into a voltage, amplified, and converted to a digital value to be processed into a digital image, either in camera or, if a raw image is used, using a computer. It’s important to understand that, in the same way that a bucket can only hold so much water, a pixel can only hold a certain amount of light.

Sensors also come in a variety of sizes. A “full frame” 35mm sensor is the same size as a frame of 35mm film (24x36mm) but a compact digital compact camera will have a much smaller sensor. My Canon Digital Ixus 70 has a 5.75×4.31mm sensor but my Nikon D70 DSLR has a 23.7×15.5 mm (Nikon DX) sensor. The Canon squeezes 7077888 pixels onto that tiny sensor whereas the Nikon only has 6016000 pixels, but each one of the Ixus 70’s pixels is significantly smaller than the D70’s and this will affect the image quality – that’s why not all megapixels are equal.

Bayer sensor patternThe quality of the image will also be affected by it’s contents – each pixel can only capture one of three colours as it has a red, green, or blue filter over the top, usually arranged in a pattern known as the Bayer Mask, with twice as many green filters as red or blue (the pattern is designed to mimic the way that we see colour). On top of the Bayer filter is an infrared filter, then an antialiasing filter (to reduce moiré) and each of these various filters steadily reduces the overall quality of the image.

An alternative filter (the Foveon X3) employs an arrangement that is similar to the one used to make up the coloured emulsion layers in photographic film, where the red, green, and blue pixels are placed on top of one another (different colours of light will penetrate further into the sensor), meaning that all pixels capture all colours, but this sensor type is relatively uncommon and also suffers from low light sensitivity.

Bayer sensor filteringThe resulting data from the sensor consists of three channels of photographic data – red, green and blue but, with the exception of the Foveon sensor, each channel is incomplete because the mask means that only certain pixels will be activated for a given colour. During raw conversion (either in-camera, or on the computer), a process known as demosaicing is used in an attempt to fill in the missing pixel data, based on the comparative brightness of the surrounding pixels, and then sharpening is applied to counteract the effect of so many filters on the sensor.

I mentioned earlier that each sensor site (or pixel) can only capture a finite amount of light, expressed as a number of levels.

The number of bits used in the analogue to digital conversion process will determine the light sensitivity, with 8 bits representing 255 levels, 12 bits for 4095 levels, 14 bits for 16383 levels and 16 bits for 65535 levels. It’s important to understand that a sensor records light in a linear fashion, so reducing the amount of light falling on the sensor by one stop (EV) will halve the number of levels of light that can be recorded. Equally, if the light is doubled, eventually the pixel will be full and the resulting effect is blown highlights.

Similarly, as the light levels drop, an effect known as posterisation (or colour banding) becomes visible, particularly in areas such as shadow detail, or the sky.

Even a few stops can make a huge difference to the number of light levels that the sensor can determine and so it is generally recommended to expose as far to the right of the histogram as possible without clipping (I’ll describe the histogram in a follow-up post). Because human vision is not linear, during raw conversion a tonal curve (including a gamma correction) is applied to the image to make it more pleasing on the eye.

The table below shows the difference between an image recorded as an 8-bit (gamma encoded) JPEG and others recorded as a 12-bit or 14-bit (linear encoded) raw file:

Stop 8-bit JPEG (gamma-encoded) 12-bit raw (linear) 14-bit raw (linear)
1st stop (brightest tones) 69 levels 2048 levels 8192 levels
2nd stop (bright tones) 50 levels 1024 levels 4096 levels
3rd stop (mid-tones) 37 levels 512 levels 2048 levels
4th stop (dark tones) 27 levels 256 levels 1024 levels
5th stop (darkest tones) 20 levels 128 levels 512 levels

Even though the logarithmic scale used for the gamma-encoded image does not fall off as sharply as the linear scale for the raw image, the overall number of discernible light levels is reduced in the JPEG (partly due to the 8-bit nature of the file format), whereas the raw files retain more detail, allowing for some exposure compensation to be applied post-capture. In addition, due to the lossy compression that is inherent with a JPEG, further image quality is sacrificed each time the image is saved.

Colour spacesColour spaces are another consideration, with each space defining the number of visible colours (or gamut) that may be represented in an image. Which colour space is “best” is often a personal consideration but it’s important to note that we can neither see, nor print all of the available colours; however, by storing the maximum possible amount of information, there is more scope for making changes later without degrading image quality. For print work, Adobe RGB may be a good colour space but for on-screen work (where the display device has a smaller gamut), sRGB may be more appropriate. I have now switched the default setting in my Nikon D70 to Adobe RGB 1998 but in reality it makes very little difference as the colour space can be altered later.

JPEG or raw?

For a JPEG image, the following process is applied to every image by the camera:

  1. RGB information from sensor is converted to colour data.
  2. Tone curve applied to convert linear-encoded data to gamma encoding.
  3. White balance set.
  4. Contrast adjusted.
  5. Colour saturation increased.
  6. Sharpening applied.
  7. 12/14-bit native file compressed to lossy 8-bit JPEG.
  8. Image is recorded to memory card.

By shooting raw, no data is lost from the sensor and a better tonal quality is retained. Images can be reprocessed years later for better (or alternative) results; however some raw processing software will be required.

Adobe Camera Raw is a free download and allows all of the adjustments that a camera would normally make to be applied to an image (and more), under the control of the photographer. It integrates with other Adobe applications (e.g. Bridge and Photoshop) for image organisation and editing. At first, the interface can be daunting – but the controls are organised in order of significance (left to right and top to bottom) and many may be ignored. Adobe’s white paper on understanding Adobe Photoshop Camera Raw 4 is also worth a read.

Adobe Camera Raw 4.0

There is one significant drawback with raw image capture though – even though the sensor data is captured in the same way, most camera manufacturers (particularly Canon and Nikon) record the data using a proprietary format. This is why software such as Adobe Camera Raw is constantly updated for new cameras; however it’s also a risk that one day those raw images will become obsolete. There is a potential solution, using Adobe’s Digital Negative (.DNG) format but adoption by manufacturers has been slow and, for many photographers, conversion from a proprietary raw format to DNG is an extra step in the workflow.

Working with raw images

Andy gave some good advice for working with raw images and I’ve added a few tips of my own to Andy’s advice:

  • At the capture stage:
    • Just because you can edit later, don’t rely on it – take your best shots with proper settings – particularly focus and exposure.
    • Get the brightest possible shot without clipping – use the camera’s histogram function and expose to the right.
    • Check the shot in-camera by zooming in on parts of the image on the LCD.
  • Back on the computer, organise the files:
    • Download images to the PC.
    • Sort, organise, tag, rank and caption as desired.
    • Add metadata.
    • Back up the images to a separate storage location.
    • Automate repetitive tasks (e.g. renaming and captioning).
  • Process the raw images:
    • Process for maximum quality.
    • Adjust colour balance.
    • Crop, straighten and sharpen (if required – and only if no more editing is to be performed).
    • Save converted files at 16-bit and back up to offline storage.
  • Edit (if required):
    • Apply any image enhancements, clean up flaws, etc.
    • Perform any creative enhancements.
    • Apply batch actions
    • Prepare for output (printing or web) – if sharpening is required, this should be the last action on the image before saving.
  • Archive:
    • Establish and implement an archival plan.
    • Save files on external devices and media for easy access and retrieval – consider off site storage.

Further reading

Further information may be found in the following articles:

Credits

Based on a presentation by Andy Gailer. The Bayer filter images used in this post are licensed under the GNU free documentation license and the colour space diagram is ©Jeff Schewe, used with permission (images from Wikipedia).

Photosynth

This content is 17 years old. I don't routinely update old blog posts as they are only intended to represent a view at a particular point in time. Please be warned that the information here may be out of date.

Photosynth logoA few months back, I heard something about Photosynth – a new method of modelling scenes using photographic images to build up a 3D representation and yesterday I got the chance to have a look at it myself. At first, I just didn’t get it, but after having seen a few synths, I now think that this is really cool technology with a lot of potential for real world applications.

It’s difficult to describe Photosynth but it’s essentially a collage of two dimensional images used together to create a larger canvas through which it’s possible to navigate in three dimensions (four actually). It began life as a research project on “photo tourism” at the University of Washington, after which Microsoft Research and Windows Live Labs took it on to produce Photosynth, using technology gained with Microsoft’s acquisition of Seadragon Software and the first live version of Photosynth was launched yesterday.

Clearly this is not a straightforward application – it’s taken two years of development with an average team size of 10 people just to bring the original research project to the stage it’s at today – so I’ll quote the Photosynth website for a description of how it works:

“Photosynth is a potent mixture of two independent breakthroughs: the ability to reconstruct the scene or object from a bunch of flat photographs, and the technology to bring that experience to virtually anyone over the Internet.

Using techniques from the field of computer vision, Photosynth examines images for similarities to each other and uses that information to estimate the shape of the subject and the vantage point the photos were taken from. With this information, we recreate the space and use it as a canvas to display and navigate through the photos.

Providing that experience requires viewing a LOT of data though—much more than you generally get at any one time by surfing someone’s photo album on the web. That’s where our Seadragonâ„¢ technology comes in: delivering just the pixels you need, exactly when you need them. It allows you to browse through dozens of 5, 10, or 100(!) mega-pixel photos effortlessly, without fiddling with a bunch of thumbnails and waiting around for everything to load.”

I decided to try Photosynth out for myself and the first thing I found was that I needed to install some software. On my Windows computer it installed a local application to create synths and an ActiveX control to view them. Creating a synth from 18 sample images of my home office desk took just a few minutes (each of the images I supplied was a 6.1 mega-pixel JPG taken on my Nikon D70) and I was also able to provide copyright/Creative Commons licensing information for the images in the synth:

Once it had uploaded to the Photosynth site, I could add a description, view other people’s comments, get the links to e-mail/embed the synth, and provide location information. I have to say that I am truly amazed how well it worked. Navigate around to the webcam above my laptop and see how you can go around it and see the magnet on the board behind!

It’s worth pointing out that I have not read the Photosynth Photography Guide yet – this was just a set of test photos looking at different things on and around the desk. If you view the image in grid view you can see that there are three images it didn’t know what to do with – I suspect that if I had supplied more images around those areas then they could have worked just fine.

You may also notice a lack of the usual office artifacts (family photos) etc. – they were removed before I created the synth, for privacy reasons, at the request of one of my family members.

My desk might is not the best example of this technology, so here’s another synth that is pretty cool:

In this synth, called Climbing Aegialis (by J.P.Peter) you can see a climber making his way up the rock face – not just in three dimensions – but in four. Using the . and , keys it’s possible to navigate through the images according to the order in which they were taken.

Potting Shed is another good example – taken by Rick Szeliski, a member of the team that put this product together:

Hover over the image to see a doughnut-shaped ring called a halo and click this to navigate around the image in 3D. If you use the normal navigation controls (including in/out with the mouse scrollwheel) it is possible to go through the door and enter the potting shed for a look inside!

There are also some tiny pixel-sized pin-pricks visible as you navigate around the image. These are the points that were identified whilst the 3D matching algorithm was running. They can be toggled on an off with the p key and in this example they are so dense in places that the image can actually be made out from just the pixel cloud.

Now that the first release of Photosynth is up and running, the development team will transition from Windows Live Labs into Microsoft’s MSN business unit where they will work on using the technology for real and integrating it with other services – like Virtual Earth, where synths could be displayed to illustrate a particular point on a map. Aside from photo tourism, other potential applications for the technology include real estate, art and science – anywhere where visualising an item in three or four dimensions could be of use.

The current version of Photosynth is available without charge to anyone with a Windows LiveID and the service includes 20GB of space for images. The synths themselves can take up quite a bit of space and, at least in this first version of the software, all synths are uploaded (a broadband Internet connection will be required). It’s also worth noting that all synths are public so photos will be visible to everyone on the Internet.

If you couldn’t see the synths I embedded in this post, then you need to install an ActiveX control (Internet Explorer) or plugin (Firefox). Direct3D support is also required so Photosynth is only available for Windows (XP or later) at the moment but I’m told that a Mac version is on the way – even Microsoft appreciates that many of the people who will be interested in this technology use a Mac. On the hardware side an integrated graphics card is fine but the number of images in a synth will be limited by the amount of available RAM.

Finally, I wanted to write this post yesterday but, following the launch, the Photosynth website went into meltdown – or as Microsoft described it “The Photosynth site is a little overwhelmed just now” – clearly there is a lot of interest in this technology. For more news on the development of Photosynth, check out the Photosynth blog.

Adobe Photoshop CS3 from a photographer’s perspective

This content is 17 years old. I don't routinely update old blog posts as they are only intended to represent a view at a particular point in time. Please be warned that the information here may be out of date.

Photography has been one of my hobbies for almost 30 years now and for the last four years I’ve been exclusively shooting in digital format but I’m still struggling to work out a decent workflow. Adobe Photoshop CS3 box shotSo, last Friday I took the day off work to attend a short course introducing key features of Adobe Photoshop and Lightroom (provided by my local Adult Education service and presented by David Tunnicliffe) and, at £36 for 6 hours of tuition, it was a bargain. I learnt a lot – and some people might find what follows to be a little obvious – but I’m hopething that for others it might be as useful as it was for me.

Adobe Photoshop CS3 is just one product from the Adobe Creative Suite, providing many more features than most photographers will need as it is designed for the graphics art industry in general. Even so, Photoshop CS3 includes some additional components that may be very useful for a photographer:

  • Introduced with CS2, Adobe Bridge literally bridges the gap between a file browser and the various applications in the Creative Suite, providing digital asset management functionality for organising, previewing and editing images.
  • Frequently updated for new proprietary raw formats, Adobe Camera Raw (ACR) provides the tools to open and edit raw image data from a digital camera. In addition to this, it can also work with JPEG and TIFF files to provide basic editing functionality without Photoshop.

In addition to the CS3 components above, there are two more products that may be of interest:

  • DNG is Adobe’s non-proprietary and royalty-free Digital Negative format which is intended to provide a solution for archival of digital images and has now been embraced by many camera manufacturers – the notable exceptions being Canon and Nikon. I don’t fancy my chances of being able to open .NEF images from my Nikon D70 in 30 years time but I’ll stand a better chance if I convert them to .DNG and Adobe provides a free DNG converter for Windows and Macintosh users.
  • Adobe Photoshop Lightroom 2 125x125Adobe Photoshop Lightroom is a product designed by photographers, for photographers using separate library, develop, slideshow, print and web views and including the ability to import (including creating folders), catalogue (with keywords) and backup in one action.

For me, Bridge was a revelation – I use my Mac for photography (so Windows utilities were no good to me) but I’ve always found Apple iPhoto a little too simplistic. It turns out that Bridge (together with ACR) is exactly what I needed to organise my images, open them in ACR (and optionally Photoshop) to perform non-destructive edits, with the changes (and associated metadata) stored in Sidecar (.XMP) files alongside the original image (avoiding the need to maintain multiple copies of images). In addition, now that I’m using Bridge I can drop a couple of utilities that I had previously relied on:

Previously, I’d struggled to get to grips with ACR (in fact, episode 40 of This Week in Photography featured a question from me asking for some guidance) but, armed with the knowledge I gained on the course and Adobe’s understanding Adobe Photoshop Camera Raw 4 white paper, I now understand that ACR is more than just a converter and it’s often all that’s required to make many adjustments to images (the exposure control in ACR let me recover an image that had been three stops underexposed) – and that it can handle JPEG and TIFF files too.

Adobe Camera Raw 4.0

As for Lightroom, David Tunnicliffe was very keen on the product (not surprising as he took part in its development) but, whilst I can see that its potentially useful for a professional photographer and that the ability to import, catalogue and backup images in one go would make a huge improvement to my workflow, I’m still not totally convinced by the interface. Maybe I’ll change my mind at version 3!

Adobe Photoshop Elements 7 125x125For those who don’t want to spend the money on Photoshop CS3 (it is very expensive if you’re not going to use it to it’s full potential) and who can manage without Bridge (which is only sold as part of Photoshop), Photoshop Elements (for Windows or Macintosh) includes enough functionality for many photographers, although some elements are hidden from the interface (find out more about the hidden elements at Richard Lynch’s site). Also, expect to see Photoshop Express become more and more useful over time. Meanwhile, ACR and the DNG converter are free downloads so they are available to Elements users too.

For me, I’m pretty sure that my new digital photography workflow will be built around Bridge and ACR and I expect to be writing some more photography-related posts as that workflow starts to come together.

Creating a photographic image with high dynamic range

This content is 17 years old. I don't routinely update old blog posts as they are only intended to represent a view at a particular point in time. Please be warned that the information here may be out of date.

Last year I wrote about the concept of making photographic images – not just taking them and my recent holiday in France was a perfect opportunity to reconnect with my photographic hobby and attempt to make some good landscape images.

I’d also been hearing a lot on the This Week in Photography podcast about the concept of high dynamic range (HDR) images (see TWiP episode 9), where multiple exposures are combined so that one or more shots exposed for the highlights are combined with others that make the most of the shadows and I decided to give that a try.

We were staying in a very attractive area of north-west France – Trévignon in Bretagne (Brittany) – and I found myself inspired to take photographs around the small port at Pointe de Trévignon. Thankfully, I have a very understanding (and patient) wife, as it took several attempts to get the image that I was looking for.

On the first evening, I went down to the harbour and took some photos. They were okay but nothing stunning. Even so, I discovered a couple of basic points that would help me out on future visits:

  • It’s really difficult for Photoshop to merge images that involve boats floating on water… the boats move so the images can’t be aligned (I felt such an idiot for not thinking of that one)!
  • If you take a set of images adjusting the aperture and the shutter speed then the two cancel one another out and what you end up with is a set of identically exposed images with a varying depth of field (that’s basic stuff from a photography 101)! In the end I settled on using either the camera’s auto-bracketing functionality (which will give me three shots at the chosen exposure interval) or, if I wanted more than three images to merge, shooting on aperture priority with manual focus and then adjusting the shutter speed to bracket the exposures (effectively fixing the focus and depth of field, then adjusting the exposure length to control the light entering the camera).

The next night I went out a bit later – I thought I’d try and catch the sunset. I tried some different sections of the coast to try and get the sun over the sea with some rocks for foreground interest (no boats this time!) but it wasn’t really working out. I’d also got my calculations wrong for when the sun would be setting and in the end I gave up waiting and went back to the house. Sometimes, you just have to accept that the ingredients for a good photo are not all there.

On the third day I had the location sorted (back to Pointe de Trévignon) and went out a bit later in the evening. I watched the sun set for an hour which was beautiful, but I still didn’t think I had the best shots. I was just about to give up when the sun finally set and – Wow! – suddenly the sky had changed and the photographic possibilities opened up to me. In the half hour after sunset I took a shot a lot of images.

This image is one of my favourites from that third night:

Pointe de Trévignon HDR

Taken about 30 minutes after sunset, the sky has begun to fade slightly but there is still plenty of colour. I’ve combined exposures taken at 0EV, -1EV and -2EV to create an HDR image then dropped back to 16-bit mode to apply a Photoshop Velvia action before finally straightening the image, cropping and saving as an 8-bit JPEG. Incidentally, I first did this in Photoshop CS2 on the Mac and the process introduced quite a bit of digital noise – switching to Photoshop CS3 seems to have corrected that problem.

As can be seen from the non-Photoshopped original images below, even without the HDR, underexposing by 1-2 stops seemed to work well (from memory, I probably used a 0.6ND graduated filter to tone down the sky too) but, whilst the the -2EV shot has plenty of sunset detail, it has silhouetted the lighthouse and rocks. The -1EV shot is balanced, but the foreground is still a little on the dark side, whilst the 0EV shot has started to burn out the sky. By merging the three shots I managed to keep both the shadow detail and the highlights and the 6 second exposure from the 0EV shot shows the movement of the water on the exposed side of the harbour wall.

Original images used to create Pointe de Trévignon HDR

The lesson for me was that I needed to work to find the right location and lighting and, importantly, it was only when I was in the right frame of mind and was excited by the natural world around me that I started to see the real photographic opportunities.

“I often think of that rare fulfilling joy when I’m in the presence of some wonderful alignment of events.

Where the light, the colour, the shapes and the balance all interlock that I feel truly overwhelmed by the wonder of it”

[Charlie Waite]

It took three visits before I got the right shots to make this image. Only once I’d fully engaged with the natural world and immersed myself in the environment around me could I unlock the photographic potential of the scene to create some technically correct images that were then combined to make something creatively pleasing.

Of course, there are some who have both the skills and the experience to just know what works and what doesn’t and they might get it right first time. I’m pretty pleased with the final result but it’s far from perfect. I need to get out more and learn what works and what doesn’t. Even after 25 years-or-so of taking photographs, I have too strong a bias towards the technology and I need to work on the creative site of things. I also need to play around a bit more with Photoshop’s HDR capabilities (or possibly some alternative packages) and see how I can gain more control over how the images are merged. For a first attempt at creating an HDR image this is not too bad but professional landscape photographers like Joe Cornish and Charlie Waite have nothing to fear from me just yet!

Photoshop Velvia

This content is 17 years old. I don't routinely update old blog posts as they are only intended to represent a view at a particular point in time. Please be warned that the information here may be out of date.

Back in the days when I used to shoot my photos on film, my preferred slide emulsion was Fujifilm Velvia (RVP). With strong colour saturation (particularly green) this film is particularly good for landscape work and, ever since I switched to digital, I’ve felt that there was some “punch” missing from my landscapes.

Then I came across episode 19 of This Week in Photography, in which the subject of creating Photoshop actions is demonstrated using “Scott’s Photoshop Velvia”. I tried it out today and it really works.

  1. Take an image and create a duplicate layer (in the process giving yourself the ability to return to the original at any time).
  2. Next, use the Channel Mixer on each of the three colour channels (red/green/blue) as follows:
    • Red channel: R 118% G -9% B -9%
    • Green channel: R -9% G 118% B -9%
    • Blue channel: R -9% G -9% B 118%
  3. Finally, adjust the contrast by tweaking the curves to produce a very slight S shape.

Here’s one of my images before and after the Photoshop Velvia treatment was applied:

Without Photoshop VelviaWith Photoshop Velvia

Hopefully you can see that the second image appears much more vibrant than the first.

Photoshop CS3 users can download the Photoshop Velvia custom action, but please note there is no warranty implied, no support, and you use it at your own risk. Thanks are due to Scott Bourne for demonstrating this – it really is a great Photoshop tip.

See who’s posting what on Flickr

This content is 17 years old. I don't routinely update old blog posts as they are only intended to represent a view at a particular point in time. Please be warned that the information here may be out of date.

Flickr logoThis is a bit voyeurstic, but it’s also a great way to see other peoples photos… Flickr Vision displays a map of the world and uses Flickr’s geotagging capabilities to display photos as they are posted to the web, all around the world. It’s actually quite mesmerising…